
Most ceiling trap doors do not fail because the panel itself is weak. They fail because of the order in which the ceiling was built around them. The frame was fixed after the board went up, or it was fixed to the board itself, or a large panel was hung off ceiling framing that was never meant to carry it. Months later the shutter sags, the groove opens up on one side, paint cracks around the frame, and the access point that was supposed to disappear into the ceiling becomes the most visible defect in the room.
This guide is about getting that sequence right in a new gypsum false ceiling. It is written for the ceiling contractor doing the work, and for the architect, project manager or homeowner supervising it. It does not replace the manufacturer’s drawings for your specific panel, and it does not invent fixing details the manufacturer has not published. What it does is lay out the sequence that matters, explain why each step comes where it does, and show where a standard Planea panel and a large Zenith+ assembly diverge — because they do not install the same way.
The direct answer
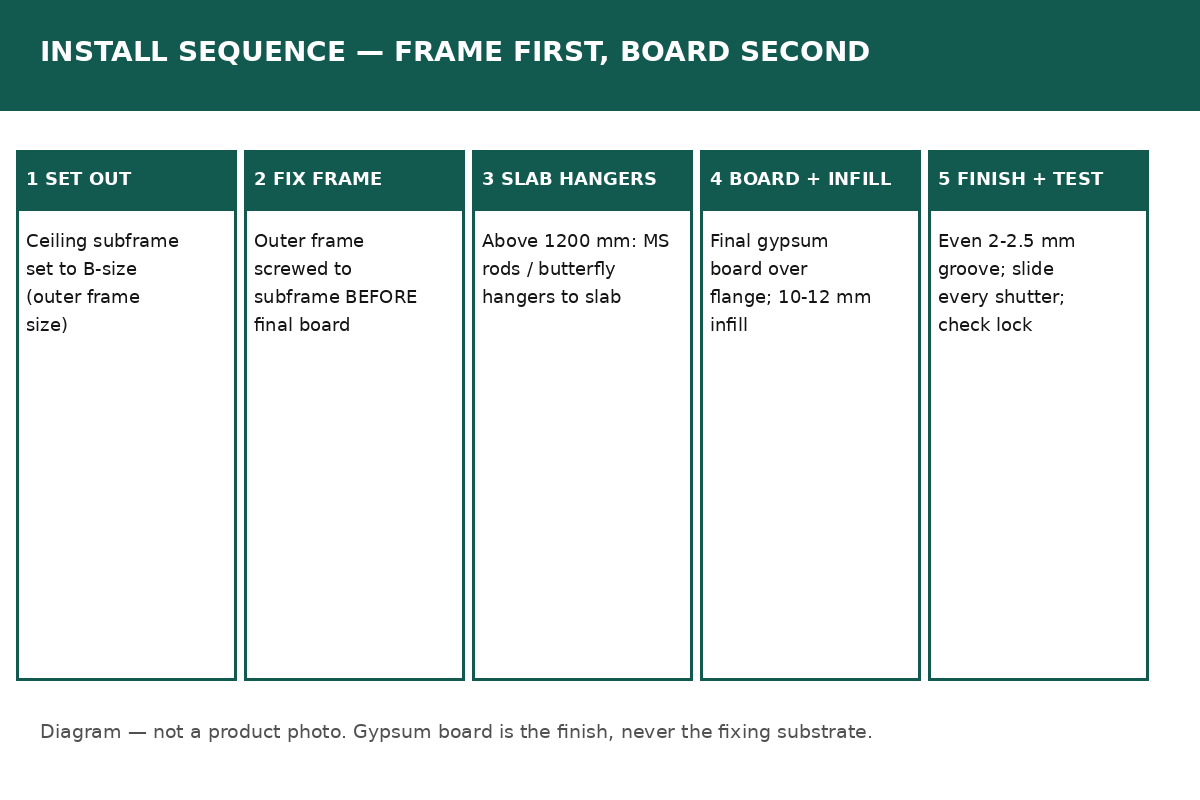
Fix the trap door frame to the ceiling subframe before the final layer of gypsum board goes on. Never fix a trap door to gypsum board alone. Gypsum board is a finish. It is not a load path, and a shutter hung off board alone will sag, drop out of plane, and stop seating cleanly in its groove.
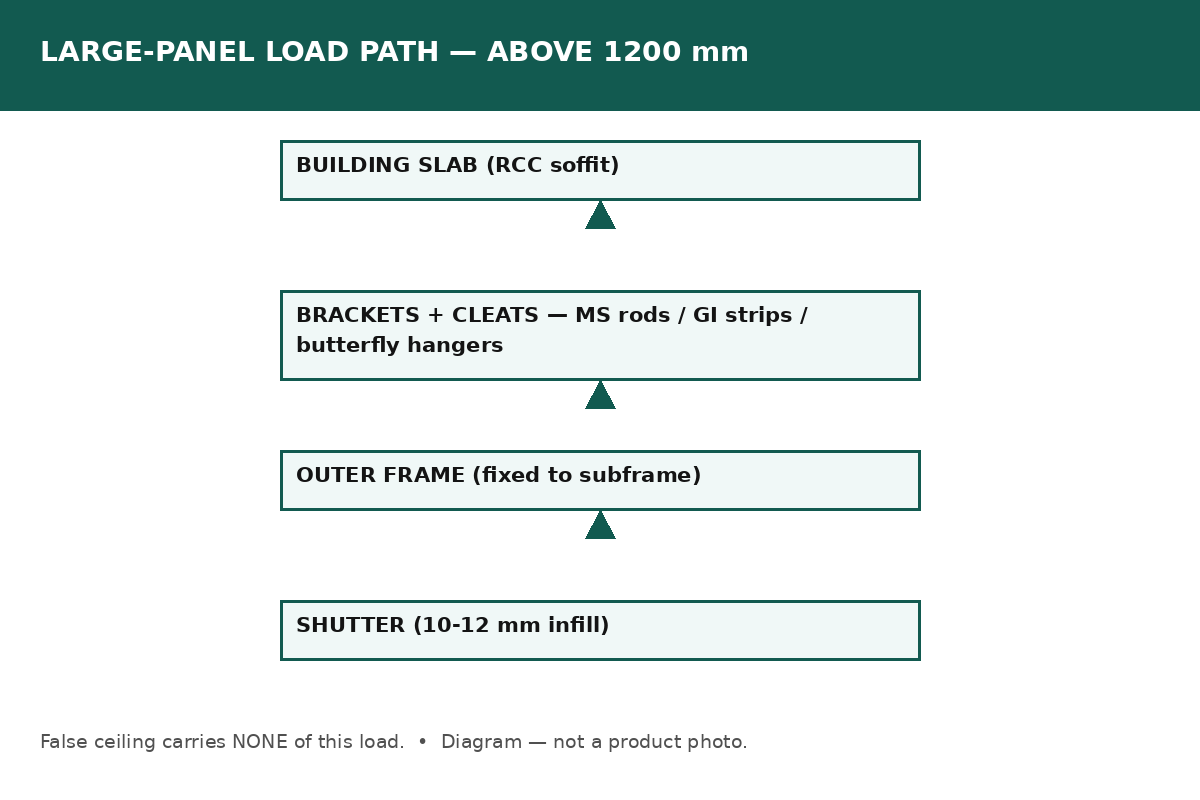
For a standard Planea panel, that subframe fixing is the whole structural story: the frame is screwed to the subframe, the board then runs over the frame flange, and the visible opening left in the finished ceiling is the A-size you ordered. For a large Zenith+ panel above 1200 mm, there is a second structural story on top of that one. The frame must also be anchored to the building slab — the true ceiling soffit — with MS threaded rods, butterfly hangers, GI strips or flats, so the weight of the panel is carried by the structure rather than by the false-ceiling framing. The false ceiling carries none of that load. That distinction, subframe fixing for standard panels and slab anchoring for large ones, is the single most important idea in this guide, and it is where most bad installs go wrong.
Before any of that, confirm the size. For a new gypsum ceiling you order by A-size, the visible opening edge to edge in the finished ceiling. The ceiling subframe is then set out to the B-size, the outer frame size, which is larger because the outer frame flange overlaps the board edge on all four sides. The full A-size versus B-size rule, with worked examples, is in the Ceiling Trap Door Sizes Guide — read that before you set out, and do not re-derive the numbers on site from memory. One caution from that guide still stands, and it affects this install directly: Skyhatch’s Planea product page currently summarises the flange as 26.8 mm for both series, while the manufacturer’s technical FAQ and the pillar specification table give 29 mm for Planea and 26.8 mm for Zenith+. This guide follows the manufacturer series figures, and you should confirm the flange figure for your series when you request a quote, until that product page is corrected. A frame set out to the wrong B-size is a problem no amount of careful board work can fix afterwards.
Why gypsum board cannot carry a trap door
A gypsum false ceiling is a suspended system. A metal subframe hangs from the slab, gypsum board is fixed to that subframe, and the finished surface is jointed, taped and painted. Saint-Gobain Gyproc describes gypsum false ceilings as a finish system chosen for appearance, durability and easy set-up, with thermal and sound insulation benefits — it does not describe board as a structural fixing substrate, and this guide does not treat it as one.
That matters because a trap door is not a light fitting or a grille. It is a moving, load-bearing element in the ceiling plane. Every time it opens, its weight transfers through its hinge and lock into its frame, and from the frame into whatever the frame is fixed to. If the frame is fixed only to board, that load path runs through a sheet material that was designed to be a surface, not a support. The screws can work loose, the board edge can crush or crack around the frame, and the shutter gradually drops. The visible symptom is sagging. The underlying cause is that the installer gave the load nowhere proper to go.
Fixing to the subframe changes the load path completely. The subframe is the skeleton the whole ceiling hangs from, and it is designed to carry distributed ceiling weight. A standard panel fixed to it behaves like the rest of the ceiling. A large panel still needs more, which is why the slab-anchoring rule exists, and that rule is covered in detail later in this guide. But the first rule never changes, whatever the size: board is the finish, frame is the structure, and the two must not be confused.
Before work starts: four decisions to lock down
Installation failures often start before anyone picks up a tool, in decisions that were left vague. Lock these four down, in writing, before the ceiling work reaches the trap door bay.
First, what must pass through the opening. Not the grille size, not the valve size, but the largest item that must ever be serviced or removed through the ceiling, with working room for hands and tools. That decision sets the A-size, and the sizes guide explains how to make it. If the equipment decision is still open, the ceiling set-out should wait — cutting a larger opening later is far more expensive than waiting for one dimension.
Second, which series. Planea, the CTD26 series, is the single-shutter standard range, from 250 × 250 mm to 1200 × 600 mm on the manufacturer’s FAQ, with 300 × 300, 450 × 450, 600 × 600 and 600 × 1200 mm held in stock. Zenith+, the CTD25 series, is the custom and large-format range, any custom size from 900 × 1500 mm to 5500 × 2400 mm and beyond, with standard configurations listed as 900 × 1500, 1500 × 2400 and 2400 × 6000 mm on its live product page. The choice is not a matter of taste. If the opening is routine and inside the standard range, Planea is the answer. If the equipment dictates a larger opening, or the opening needs several shutters, it is Zenith+. Trying to stretch a standard panel to a large job, or to use a large custom assembly for a routine valve, both create problems that show up at install.
Third, the ceiling finish and infill. Both series carry a 10 to 12 mm infill of the ceiling material in the shutter — MR gypsum, pre-laminated board, ACP, laminate, veneer or honeycomb panel, among others on the product pages — finished on site to match the surrounding ceiling. Confirm the infill material and thickness before the frame goes in, because the shutter is finished to match the ceiling around it, and a late change of finish means rework on a panel that is already fixed.
Fourth, the lock. Planea uses a concealed push lock as standard, with an Allen key lock as an option. Zenith+ uses an Allen key lock, which suits large, heavy shutters better than a light push lock. The lock choice affects who can open the panel and how securely a heavy shutter stays closed, so it should be decided at specification stage, not discovered on site when the shutter will not stay shut.
Get those four decisions in the same message you send with the order: A-size, ceiling type, what must pass through, series, infill, lock, and quantity. That is also exactly what a quote enquiry needs, which is why the final section of this guide returns to it.
Step 1 — Set out the subframe to the B-size, before board goes up
The install starts with the ceiling subframe, not with the trap door. The subframe around the trap door bay is set out to the B framing size: the outer frame size of the panel, derived from the A-size plus the flange on all four sides. Using the manufacturer series figures, that is A plus 29 mm per side for Planea and A plus 26.8 mm per side for Zenith+. The board will later run over the flange from B to A, leaving the visible A opening in the finished ceiling.
This step is where the frame-first rule begins to bite. If the subframe is set out to the A-size instead of the B-size, the frame flange has nowhere to sit under the board, and the installer is forced into cutting, packing or improvising around a frame that does not land on its support. If the subframe is set out after the board is already up, the same problem appears in a worse form: the board has to be cut back, the frame has to be fitted into a hole that was never detailed for it, and the finished edge around the panel is a repair rather than a detail.
Set out in millimetres, measure both dimensions, and measure twice. Ceilings are rarely as square as drawings suggest, and a frame that is a few millimetres out at set-out will show up as an uneven shadow groove in the finished ceiling. Check what is above the ceiling at the same time: ducts, pipes, cable trays and structural members that reduce the usable opening, and the space needed for slab hangers if the panel is large. Finding a duct in the middle of the opening after the subframe is tied is a design failure, not an install problem, and it is preventable at set-out.
Step 2 — Procure the panel beforehand, and fix the frame to the subframe
The manufacturer’s ordering guidance for Planea is explicit, and it is worth quoting in substance: fix the Skyhatch frame to the ceiling subframe before the final layer of gypsum board is installed, for best results. That is not a preference. It is the sequence the product was designed around, because the flange is designed to disappear under the board edge.
In practice, that means the trap door must be procured beforehand, not ordered after the ceiling is boarded. The frame arrives, it is fixed to the subframe with screws — the manufacturer’s technical FAQ describes Planea as fixing to the sub-frame of the false ceiling with screws — and only then does the final board layer go on over the flange. The jointed, non-crimped frame construction helps here: because the frame uses cleats and brackets rather than permanently crimped corners, it can be opened, resized on site to accommodate dimensional variations, and reassembled. That is a tolerance for real site conditions, not a substitute for correct set-out, and it does not rescue a frame that was fixed to board instead of subframe.
For a standard Planea panel, this is the structural core of the install. The frame is now part of the ceiling skeleton, the board will hide its flange, and the shutter will hang from a frame that is itself properly supported. Everything after this step is finishing and testing, not structure.
Step 3 — For large panels above 1200 mm, anchor to the slab
This is the step that separates a large Zenith+ install from a standard one, and skipping it is the most serious install error in this guide.
Zenith+ is anchored to the true ceiling soffit — the RCC slab or roof structure — using GI strips, butterfly hangers or MS threaded rods, in the manufacturer’s words, so the weight of a large trap door is carried by the structure rather than by the false-ceiling framing. The Zenith+ ordering guide states the same rule in drawing terms: for sizes above 1200 mm, include MS threaded rod or butterfly hanger attachment points from the building slab in your drawings. The manufacturer’s technical FAQ is blunt about why: loading ceiling framing with a large trap door leads to deterioration and, in the worst case, accidents.
The load path is worth stating plainly, because it is the check an inspector or supervising engineer can actually verify on site. Shutter to frame, frame to bracket, bracket to structure. The outer sections accept purpose-designed brackets and cleats, positioned according to the unit’s size and weight, and those brackets connect the frame to the slab soffit or roof structure through threaded rods, GI strips, flats or butterfly hangers. The false ceiling carries none of it. If you cannot trace that path on site — if the large frame is hanging only from ceiling framing, with no bracket to the slab — the install is not complete, however tidy the finished ceiling looks.
This step must be in the drawings, not improvised on site. Hanger positions, bracket types and the route from frame to slab need to be coordinated with the services above the ceiling before the ceiling closes, because retrofitting slab hangers through a finished ceiling defeats the purpose of planning access in the first place. It is also why the size decision and the series decision in the earlier section matter so much: a panel that crosses the 1200 mm threshold changes the structural scope of the job, and that change should be priced and drawn, not discovered by the installer.
Multi-shutter logic belongs in this step too. Zenith+ is available as a single or multi-shutter assembly with two, three, four or more panels, and every shutter slides to one or both sides, leaving the whole opening clear with no crossbar across it. The shutter count is chosen by required opening width and access frequency, following the product ordering guide. A very large opening handled as one giant shutter would be heavy, awkward and unsafe to operate. Several shutters that slide aside solve the same opening without asking anyone to carry a huge panel. The sliding-hinge blog explains that handling problem in detail; the install point here is simpler: do not let shutter count be decided on site by what is easiest to fix. It is part of the structural and operational design, and it affects the frame, the hangers and the finishing sequence.
Step 4 — Board, infill and finish to an even shadow groove
With the frame fixed — and, for large panels, slab-anchored — the final gypsum board layer goes on over the flange, leaving the A-size visible opening. The shutter is then fitted with its 10 to 12 mm infill, finished on site to match the surrounding ceiling. When the panel is closed, the only visible joint should be the shadow groove: 2 to 2.5 mm at the shutter-to-frame joint on the Skyhatch product pages.
That groove is the finish check that tells you whether the earlier steps were done right. An even groove all round means the frame is square, level and properly supported, and the shutter is seating as designed. A groove that is tight on one side and open on another means something is out — the frame is out of square, the shutter is not seating, or the frame has moved under load. Do not fill an uneven groove with paint or filler and call it finished. Find the cause, because a groove problem at handover becomes a sagging or jamming problem in service.
Infill finishing deserves the same care as the rest of the ceiling. The shutter carries the same material as the ceiling around it, and it is finished on site to match. That is what makes the closed panel disappear into the ceiling, and it is also why the infill decision had to be locked down before install. A shutter finished in a different board, a different thickness, or a different paint batch will read as a patch, not as a ceiling, even if its groove is perfect.
Both series carry GreenPro Type 1 Ecolabel certification from CII GreenPro, a third-party verified ecolabel based on a life-cycle approach. That certification does not change the install sequence, but it does matter for the project record: on green-building projects, the product documentation is part of the submission, and an installed panel whose series, size and certification are recorded correctly is easier to evidence than one whose details were never written down.
Step 5 — Test every shutter, lock and safety wire before handover
No install is complete until it has been operated, not just looked at. Test every shutter, not just one. Slide each shutter fully to one or both sides, as its design allows, and check that it moves freely, clears the opening completely, and returns to seat cleanly in its groove without forcing. Check the steel safety wire retention on each shutter — on Zenith+ the product page specifies steel wire retention on each shutter, and on Planea the sliding hinge itself means the shutter stays attached to the frame throughout operation rather than having to be carried down a ladder. Confirm the lock: push lock on Planea, Allen key lock on Zenith+, engaging cleanly and holding the shutter closed without play.
Then check the ceiling around the panel. Look for cracked joints, board edges lifting around the flange, or paint cracking where the frame meets the board — all early signs that the frame is moving under load or was fixed to board rather than subframe. Flag any sag, uneven groove, shutter that will not seat, or lock that will not hold, and do not present a failed test as a pass. A panel that fails its handover test will fail worse in service, when it is opened by a maintenance technician at height rather than by the installer on a clean site.
Record the test with the panel details: series, A-size, shutter count, lock type, and, for large panels, confirmation that slab hangers were installed. That record is what the next person to open the panel — often years later, on a different maintenance contract — will wish had been kept.
Five install mistakes, and how to avoid them
First, fixing to the board instead of the subframe. This is the classic failure, and it is also the easiest to avoid: frame to subframe, before final board, every time, whatever the size.
Second, boarding first and fitting the frame second. The sequence is not interchangeable. Board first forces cutting and patching around a frame that was designed to sit under the board edge, and the finished detail will show it.
Third, hanging a large panel off ceiling framing with no slab support. Above 1200 mm, the slab-hanger rule applies. A large panel that fits perfectly but hangs only from framing is a structural failure waiting for time and vibration to reveal it.
Fourth, setting out to the wrong dimension. Frame to the B-size, order by the A-size, and state which one you are quoting. The sizes guide covers this in full, with the flange caution repeated in this guide, because a set-out error cannot be corrected by good finishing.
Fifth, finishing over a failed test. An uneven groove, a shutter that does not seat, a lock that does not hold — these are not cosmetic issues to be painted over. They are the install telling you something is wrong, and the cheapest time to fix it is before handover, while the ceiling team is still on site.
What this guide does not cover — and where to find it
This is a new-gypsum-ceiling guide, deliberately. Two neighbouring topics are covered in their own guides, and this blog does not try to absorb them.
If your ceiling is already closed, or you are replacing an old wooden trap door in a finished ceiling, the sequence is different: you measure the existing opening and order by B, the outer frame size, because the frame must cover the existing opening. That retrofit method will be covered in the dedicated retrofit guide, and the manufacturer’s FAQ already confirms the principle: measure the existing opening and order by B.
If your ceiling is POP rather than gypsum board, the fixing and finishing method also differs, because a POP ceiling has no board frame in the same sense — and again, the manufacturer guidance is to order by B for a POP ceiling, where the opening left in the POP, with its wire mesh protruding into it, corresponds to B. The dedicated POP guide will cover that method step by step. Do not apply this gypsum sequence to a POP ceiling, or vice versa, and expect the same result.
Keeping those three guides separate is not pedantry. It is what prevents a reader from following the wrong sequence for their ceiling type and then blaming the panel for a failure the sequence caused.
Ordering and quote checklist: what to send
A complete enquiry, and a complete install record, fit in the same few lines:
- A-size (visible opening) in millimetres, both dimensions, with the letter A stated
- Ceiling type: new gypsum board (this guide), POP, or existing framed opening
- What must pass through: the largest item, its dimensions, and how often access is needed
- Series: Planea for standard sizes, Zenith+ for custom or large openings, with shutter count if large
- Infill material and finish, lock preference, and quantity
- Whether the panel is above 1200 mm, so slab hangers can be included in the drawings
- Project location and whether the order is a single unit or a bulk/project quantity
For a standard Planea size, that enquiry can go to the product page and a stock order. For a custom Zenith+ size, share the same details through the Get a Quote route, because the quote depends on the exact A-size, shutter count and support requirements. There is no minimum order quantity on the manufacturer’s side — a single unit can be ordered — but the size and support information still has to be exact, because custom panels are made to the dimension you give, and large panels are anchored to the structure you describe.
Frequently asked questions
When should the trap door frame be fixed — before or after the gypsum board?
Before the final layer of gypsum board is installed. Fix the frame to the ceiling subframe first, then board over the flange. That is the manufacturer’s sequence for Planea, and it is what leaves a clean A-size visible opening with an even shadow groove.
Can a trap door be fixed to gypsum board alone?
No. Gypsum board is a finish, not a load path. A shutter hung off board alone will sag, drop out of plane and stop seating in its groove. Fix to the subframe for standard panels, and add slab anchoring for large panels above 1200 mm.
How is a large trap door supported?
By the building structure, not by the false ceiling. For Zenith+ above 1200 mm, MS threaded rods, butterfly hangers, GI strips or flats connect the frame, through purpose-designed brackets and cleats, to the slab soffit or roof structure. The complete load path is shutter to frame to bracket to structure, and the false ceiling carries none of it.
What size opening do I frame for?
Frame to the B-size, the outer frame size, and order by the A-size, the visible opening. The sizes guide gives the full rule with worked examples, including the flange caution: confirm whether your series uses 29 mm (Planea, manufacturer figure) or 26.8 mm (Zenith+) per side at quote stage, until the Skyhatch Planea product page is corrected.
Can it be fitted into a ceiling that is already closed?
Yes, but not by this guide’s sequence. Measure the existing opening and order by B, the outer frame size, and follow the retrofit method, which will be covered in the dedicated retrofit guide. Do not cut a new-gypsum sequence into an already-finished ceiling and expect the same finish.
Does the shutter have to be carried down a ladder for service?
No. The sliding hinge means the shutter stays attached to the outer frame throughout operation, and it is held additionally by a steel safety wire. It can still be removed deliberately for full access, realignment or large-panel installation, but routine service does not require carrying a shutter down a ladder.
What finish will the closed panel have?
The same finish as the ceiling around it. The shutter carries 10 to 12 mm of the ceiling material, finished on site to match, and closes to a 2 to 2.5 mm shadow groove. If the groove is uneven, the frame or shutter is out of alignment — fix the cause, do not fill the groove.
Conclusion
Installing a ceiling trap door in a gypsum ceiling is not difficult, but it is sequence-sensitive. Set out to the B-size before board goes up. Fix the frame to the subframe, not to the board. Anchor large panels above 1200 mm to the slab, through brackets, so the false ceiling carries none of their load. Board over the flange, finish the infill to match, and test every shutter, lock and safety wire before handover. Skip any one of those steps and the ceiling will eventually tell you — in sagging, in an uneven groove, or in a shutter that no longer seats.
If you are about to start, confirm the A-size, confirm whether the panel crosses the 1200 mm slab-hanger threshold, and share both with your supplier before the ceiling closes. For a standard size, the Planea range covers most routine access points. For anything larger, a Zenith+ custom size with the right shutter count and slab anchoring is the honest answer — and it is far cheaper than reopening a finished ceiling to fix a panel that was installed in the wrong order.
Get a Quote CTA: Share your A-size opening, whether the panel is above 1200 mm, and your ceiling finish — https://skyhatch.in/get-quote/