
Your POP ceiling is finished. The paint is done, the cove lights are in, and then the air-conditioning technician, the electrician or the plumber needs to get above it. Somewhere above that smooth plaster ceiling sits a valve, a junction box, a fan coil unit or a duct joint that will need attention again — and the question is no longer whether you should have planned an access point. It is whether an engineered ceiling trap door can be fitted into a POP ceiling at all, and if so, how it is ordered, fixed and finished without ruining the ceiling it sits in.
The short answer is yes, it can — but not by following the gypsum rule. A POP ceiling is built differently from a gypsum board ceiling, so the ordering dimension, the fixing point and the finishing conversation are all different. Get the ordering dimension wrong and the panel does not fit the opening. Fix to the plaster instead of to the framing or the structure and a large panel has nothing sound to hang from. Finish the shutter in the wrong material and the panel stays visible for exactly the reason you bought a concealed panel in the first place.
This guide explains the POP difference only. It does not repeat the full gypsum installation sequence — that is covered in the step-by-step gypsum-ceiling installation guide — and it does not write the wooden-door retrofit guide, which follows separately. If your ceiling is gypsum board, read that install guide. If your ceiling is POP, read on.
The direct answer: order B, fix to what is already there, finish to match
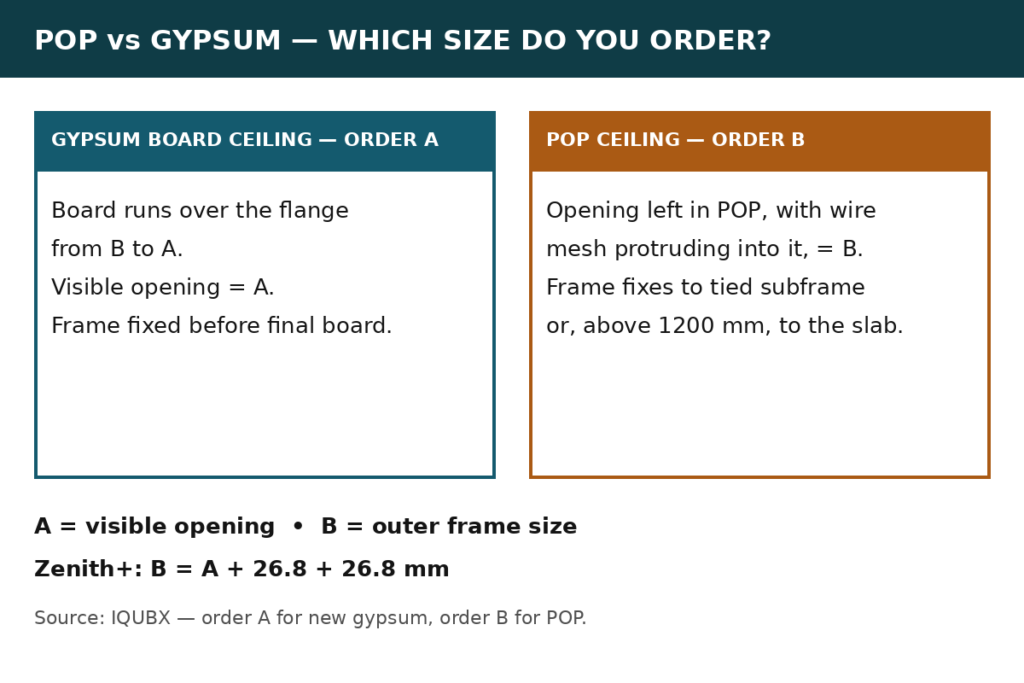
For a POP ceiling, order by B — the outer frame size — not by A, the visible opening size. That is the manufacturer’s own rule, stated plainly on IQUBX’s Skyhatch ceiling trap door page: “For a new gypsum board ceiling, order A. For a POP ceiling, order B: the opening left in the POP, with the wire mesh protruding into it, is equal to B. If the sub-frame is already tied, ordering B keeps things simple.” The same page adds the general version of the rule: “Specify A for new ceilings; give B for POP ceilings or where the framing already exists.”
In a POP ceiling, the framing is already tied and the plaster is already applied, so there is no “before the board goes on” stage to fix a frame into. The frame therefore fixes to the ceiling subframe that is already there — and, for a large panel, to the building slab above it, not to the plaster. And the shutter’s infill is finished on site to match the surrounding ceiling, in the manufacturer’s words, so that the closed panel reads as ceiling, not as a hatch.
Those three sentences — order B, fix to the tied framing or the slab, finish to match — are the whole POP method. The rest of this guide unpacks each one, shows where readers most often go wrong, and tells you exactly what to measure before you ask for a quote.
What a POP ceiling actually is — and why it changes the trap door
POP stands for Plaster of Paris, and a POP false ceiling is not a board ceiling with a different name. Saint-Gobain Gyproc notes that POP and gypsum boards are two of the most popularly used materials for building a false ceiling, that they are different from each other, and that they both have gypsum as their base. That shared base is where the similarity ends for trap-door purposes.
A POP ceiling is formed on site: POP powder is mixed with water and applied over a mesh that is attached to the ceiling’s metal framing system, then treated and dried, as described in Gharpedia’s guide to POP false ceilings. The mesh — commonly called chicken net or wire mesh — gives the wet plaster its mechanical key, and the finished surface can be moulded into cornices, curves and decorative shapes that a flat board cannot easily follow. That hand-formed, wet-applied character is exactly why POP remains popular in Indian homes, and exactly why a trap door designed around a factory board edge does not drop straight into it.
A gypsum board ceiling, by contrast, is assembled from factory boards fixed to a metal subframe, with the board edge available to run over a trap-door frame flange. The gypsum install guide’s frame-first sequence — frame fixed to the subframe before the final board layer — works because there is a board layer still to come. In a finished POP ceiling there is no board layer still to come, no board edge to overlap, and no second chance to build the frame in before the finish. The trap door has to work with the opening and the framing that already exist. That single difference drives everything else in this guide.
| Gypsum board ceiling | POP ceiling | |
|---|---|---|
| How the ceiling is formed | Factory boards fixed to a metal subframe | POP powder mixed with water on site, applied over mesh on the framing, then dried |
| What the trap-door frame fixes to, in a new ceiling | The subframe, before the final board layer is installed | There is no equivalent “before board” stage in a finished POP ceiling |
| Ordering rule (manufacturer) | Order A, the visible opening | Order B, the existing POP opening — with wire mesh protruding into it |
| What the flange overlaps | The gypsum board edge | There is no board edge — see the seating note below |
| Best Skyhatch series for a POP ceiling | Planea for standard sizes, Zenith+ for large/custom | Zenith+ is the series Skyhatch itself lists as POP-compatible (see series section) |
The ordering rule, in full: A, B, and the POP opening
Two dimensions matter for every Skyhatch trap door, and they are not the same number. A is the visible opening — the shutter size, from the inside of the outer frame to the inside of the outer frame. B is the outer-to-outer size of the complete frame. On the manufacturer’s page, B = A + 29 + 29 for Planea and B = A + 26.8 + 26.8 for Zenith+, so a 600 × 600 mm Planea opening has an outer frame size of 658 × 658 mm on the manufacturer’s figures.
For a new gypsum ceiling you order A, because the board will run over the flange from B to A and the visible opening is what you are specifying. For a POP ceiling you order B, because the opening that already exists in the plaster — with the wire mesh protruding into it — is B. You are not specifying a hole to be cut later. You are measuring a hole that is already there, mesh and all, and asking for a frame whose outer size matches it.
That distinction is where POP orders most often go wrong. A reader who has just read the sizes guide and then applies its gypsum rule to a POP ceiling will order A — and will order a frame that is too small for the POP opening it has to fill. The Ceiling Trap Door Sizes Guide remains the right place for the full A-versus-B explanation, including the ordering mistake that causes wrong deliveries, but its gypsum application must not be carried across into POP. In POP, the number you measure is B, and the number you share for a quote is B.
A worked POP example (Zenith+ figures)
Suppose the opening left in your POP ceiling measures 900 × 600 mm, mesh protruding into it. That 900 × 600 mm is your B. For Zenith+, where B = A + 26.8 + 26.8, the visible opening A that results is 900 − 53.6 = 846.4 mm by 600 − 53.6 = 546.4 mm. You do not need to do this subtraction yourself when you enquire — share the measured B and the series you are considering, and the supplier derives the visible opening — but understanding the arithmetic stops a common misunderstanding: the visible opening in a POP ceiling will be smaller than the plaster opening you measured, by the frame on each side, and that is normal. It is not a shortfall in the panel.
A note on the Planea offset — read this before you quote a Planea size
This blog’s ordering maths uses the manufacturer’s offsets: 29 mm per side for Planea, 26.8 mm per side for Zenith+. That choice is stated openly because the live Skyhatch Planea product page currently shows 26.8 mm for Planea as well, which would give a different B for the same A. Do not treat both figures as true, and do not average them. For a POP order, share your measured B — the plaster opening itself — rather than a derived A, and confirm the series offset at quote stage so the frame that is made matches the opening that exists. The POP rule itself — order B — is unaffected by this offset question: whichever offset applies to your series, the number you measure in a POP ceiling is still B.
How a trap door fixes in a POP ceiling — to framing, never to plaster
The fixing rule follows the same logic as the ordering rule: fix to what carries load, not to what carries finish. Plaster is a finish. It is not a fixing point for a trap-door frame, and a large panel must never be hung from it.
For standard panels, the manufacturer’s fixing description is that Planea fixes to the subframe of the false ceiling with screws. In a POP ceiling that means the metal framing already tied above the plaster — the same framing system the mesh was attached to — not the plaster skin itself. The frame is fixed to that subframe, the shutter engages with it, and the plaster around the opening is left to do what it was made to do: be a ceiling surface.
For large panels, the load path goes further. Zenith+ is anchored to the true ceiling soffit — the RCC slab or roof structure — using GI strips, butterfly hangers or MS threaded rods, so the weight of a large trap door is carried by the structure rather than by the false ceiling framing. The manufacturer’s page states the principle without qualification: “The false ceiling carries none of it.” Skyhatch’s own Zenith+ page carries the same rule in project terms: MS threaded rods or flat hangers for large installations above 1200 mm, with attachment points from the building slab to be included in the drawings for sizes above 1200 mm. In a POP ceiling that rule matters more, not less, because a reader who assumes a POP ceiling’s framing will carry a large panel is making exactly the mistake the slab-anchoring rule exists to prevent.
In sequence terms — no fixing figures are stated here, because no screw or hanger spacing figure for POP fixing was verified from a manufacturer or Skyhatch source — the POP job runs like this: measure the existing POP opening as B, including the mesh protruding into it; confirm whether the opening is above 1200 mm, because that decides whether slab hangers enter the specification; fix the frame to the already-tied subframe, or anchor a large frame to the slab through the threaded rods, GI strips or hangers described above; fit the shutter with its infill; finish the infill on site to match the surrounding ceiling; and test the slide, the seating and the lock before the ceiling is handed back. That is the sequence. It is deliberately not a gypsum-install repeat: the gypsum guide’s board-before-or-after order does not apply, because in POP the ceiling is already finished.
Two practical points belong in the same section. First, if the POP opening sits inside a decorative run — a cornice, a cove profile or a moulded border — say so at quote stage, because the frame and the finish have to be planned around a feature that cannot simply be cut through like a flat board. Second, if the ceiling above the opening carries a heavy service — a fan coil unit, a large duct section or a valve assembly that has to be lifted out, not just reached — that is a sizing conversation before it is a fixing conversation, and it points to the large-format, multi-shutter end of the range, not to a single standard shutter.
Which series for a POP ceiling — Zenith+ first, Planea with a caveat
This is the section where honesty about the product pages matters most, because the two Skyhatch series are not equally documented for POP.
Zenith+ (CTD25) is the POP-listed series on Skyhatch’s own site: its Ceiling Compatibility line reads “Gypsum / MR board / POP / ACP / Laminate / Veneer / WPC / Louvred ceilings.” It is also the series built for the cases POP ceilings most often present as a problem: custom sizes, large openings, multi-shutter assemblies in which every shutter slides aside to leave the whole opening clear, an Allen key lock suited to a heavy shutter, steel wire retention on each shutter, and slab anchoring above 1200 mm. If your POP opening is large, irregular, or set by the equipment above it rather than by a catalogue size, Zenith+ is the series to start from.
Planea (CTD26) is the standard-size, single-shutter series — stocked sizes from 300 × 300 mm to 600 × 1200 mm, a sliding hinge, a concealed push lock as standard with an Allen key lock as an option, and a 2–2.5 mm shadow groove. What it is not, on Skyhatch’s own site today, is POP-listed: its page lists infill compatibility as MR gypsum, pre-laminated board, ACP, laminate, veneer and honeycomb panel, with no POP mention, and its ordering guide is written throughout for a gypsum ceiling. That does not prove Planea cannot be used in a POP ceiling — the manufacturer’s general POP rule, order B, is stated for the system, and Planea’s subframe fixing is the same principle — but it does mean this blog will not present Planea as POP-verified on Skyhatch’s site when its own page does not say so. If your POP opening is a standard size and you are considering Planea, confirm POP suitability for that size at quote stage and share the measured B. For a POP ceiling, the safe default in this guide is Zenith+, with Planea as a standard-size option to confirm, not as an assumed equivalent.
The lock choice inside either series follows the same logic as the rest of the range, and it is covered in full in the push lock vs Allen key lock guide: a push lock suits a private, frequently opened standard panel; an Allen key lock suits a large, heavy or public-area panel where unauthorised opening matters. Both series pages also list GreenPro Type 1 Ecolabel certification; CII GreenPro describes its ecolabel as a Type-1, life-cycle-based label for products with lower environmental impact — relevant only if the project is pursuing a green-building submission, and no price or credit claim is attached to it here. In a POP home, that usually means push lock for a bedroom or living-room service point and Allen key lock for a large or shared-area panel — but the guide, not this paragraph, is the place to make that call.
Finishing: the shutter has to disappear into plaster, not just cover a hole
A concealed trap door fails in POP for a subtler reason than in gypsum: the surrounding surface is hand-finished plaster, with its own texture, paint and light response, so a shutter finished in a visibly different material does not read as a panel. It reads as a patch.
The verified position is the manufacturer’s: the shutter carries any 10–12 mm material — MR gypsum board, pre-laminated particle board, WPC or PVC board, ACP, laminate, veneer on base board, calcium silicate board, honeycomb lightweight panels, or other decorative material — and the infill is finished on site to match the surrounding ceiling. That “finished on site to match” is the whole finishing instruction, and it is also the limit of what this blog claims. It does not claim that POP plaster itself is the shutter infill, because POP plaster is not named in the manufacturer’s infill list, and whether a plaster finish can be carried on a moving shutter — and at what thickness, and whether it cracks — was not verified from a manufacturer or Skyhatch source for this guide. If a supplier proposes a POP-plaster shutter finish, ask for the specification behind it rather than accepting it as standard.
What can be said, from the product pages, is what the finished result should look like: a 2–2.5 mm shadow groove at the shutter-to-frame joint, no visible flange on the face, and, on Planea, no visible keyhole with the push lock. The sliding hinge matters here for a POP-specific reason, explained in the sliding hinge guide: the shutter stays attached to the frame throughout opening, so servicing above a finished POP ceiling does not mean carrying a shutter down a ladder and risking a mark, a chip or a crack in the plaster around the opening on every visit. A shutter that has to come off to be serviced will, over time, damage the very finish it was meant to preserve.
Can a POP ceiling carry a large trap door?
Yes — but the ceiling does not carry it. The structure does. That sentence is worth repeating because it is the most dangerous misunderstanding in POP access work: a POP ceiling looks solid, feels solid, and is not a load-bearing element for a trap door.
For any opening above 1200 mm, the specification must include slab anchoring — MS threaded rods, flat hangers, GI strips or butterfly hangers to the RCC soffit or roof structure, as described on both the manufacturer page and the Zenith+ page. For a multi-shutter opening, the shutters slide aside on the sliding hinge to leave the whole opening clear without a crossbar across it, which is what makes a large POP opening usable for equipment removal rather than just for reaching a valve. And for any large opening, the frame is jointed rather than crimped, so it can be opened, resized and reassembled — a property that matters when the as-built POP opening differs by a few millimetres from the dimension on the drawing, as site-formed openings often do.
What this blog does not do is give a maximum POP opening size. No such figure was verified from a manufacturer or Skyhatch source, and a maximum would in any case depend on the framing already tied, the slab fixing available, the shutter count and the service above. The honest answer to “how large can my POP trap door be?” is a quote conversation with the measured B, the framing position and the service requirement — not a number in a guide.
The POP mistakes to avoid
| Mistake | Why it fails in POP | What to do instead |
|---|---|---|
| Ordering A, the gypsum rule | The frame arrives too small for the POP opening, which is B | Measure the POP opening, mesh protruding, as B; share B for the quote |
| Fixing the frame to the plaster | Plaster is a finish, not a fixing point; a large panel has nothing sound to hang from | Fix a standard frame to the already-tied subframe; anchor a large frame to the slab |
| Hanging a large panel off POP framing | The false ceiling carries none of a large panel’s load, by design | Specify slab hangers above 1200 mm; use the multi-shutter Zenith+ form for large openings |
| Finishing the shutter in a mismatched material | The panel stays visible as a patch in a hand-finished plaster ceiling | Use a verified 10–12 mm infill, finished on site to match the surrounding ceiling |
| Copying the gypsum flange sentence into POP | There is no board edge for a flange to overlap in POP | Describe the POP opening as B, mesh protruding, and confirm seating at quote stage |
| Assuming a standard series is POP-listed | The Skyhatch Planea page does not list POP; Zenith+ does | Lead with Zenith+ for POP; confirm Planea-for-POP at quote stage for a standard size |
| Cutting a new POP opening without checking the framing | The opening, the mesh and the tied framing have to agree before a frame is made | Confirm the framing position and the B size together, before ordering |
What to measure before you ask for a quote
A POP quote enquiry needs fewer numbers than a new-ceiling specification, but it needs the right ones. Share these, and the supplier can derive the rest:
- Your B size: the existing POP opening, measured edge to edge in both directions, with the wire mesh protruding into it — that measurement is B, not A.
- Whether the opening is above 1200 mm in either direction, because that decides whether slab hangers enter the specification.
- What sits above the opening: a valve or junction box that only needs reaching, or equipment that has to come out through the opening — that decides single versus multi-shutter.
- Who should be able to open it: a private room, where a push lock is convenient, or a shared or public area, where an Allen key lock is the safer choice.
- The finish to match: the surrounding POP ceiling’s paint and texture, so the infill can be finished on site to match it.
- Any decorative feature at the opening: a cornice, cove or moulded border that the frame has to work around.
No price is stated in this guide, deliberately: price bands, what they buy, and why large panels are quoted rather than shelf-priced are covered separately in the ceiling trap door price guide. Share the measurements above and ask for a quotation on that exact specification, rather than comparing a POP panel with a gypsum panel by price alone.
Frequently asked questions
Can you fit a trap door in a POP ceiling?
Yes. The manufacturer’s rule for POP is to order by B, the existing POP opening with wire mesh protruding into it, and to fix the frame to the subframe already tied above the plaster — or, for a large panel, to anchor it to the building slab. Zenith+ is listed by Skyhatch as compatible with POP ceilings. What you cannot do is treat a POP ceiling like a gypsum board ceiling and fix a frame in before a board layer that does not exist.
Do you order A or B for a POP ceiling?
B. For a new gypsum board ceiling, order A, the visible opening. For a POP ceiling, order B, the outer frame size, because the opening left in the POP, with wire mesh protruding into it, is equal to B. If the subframe is already tied, ordering B keeps things simple. Share the measured POP opening as B for your quote.
How is a trap door fixed when there is no gypsum board?
To the framing that is already there, not to the plaster. A standard frame fixes to the ceiling subframe with screws. A large frame is anchored to the true ceiling soffit — the RCC slab or roof structure — using GI strips, butterfly hangers or MS threaded rods, so the false ceiling carries none of the load. No screw or hanger spacing figure is stated here, because none was verified for POP fixing from a manufacturer source.
Can a POP ceiling carry a large trap door?
The POP ceiling itself does not carry a large trap door; the structure does. Above 1200 mm, slab hangers are part of the specification, and a multi-shutter Zenith+ assembly lets every shutter slide aside to leave the whole opening clear. There is no verified maximum POP opening size to quote here — the size depends on the framing, the slab fixing, the shutter count and the service above, so it is settled at quote stage with the measured B.
What finish does the shutter get in a POP ceiling?
A verified 10–12 mm infill — for example MR gypsum board, pre-laminated board, WPC or PVC board, ACP, laminate, veneer on base board, calcium silicate board or a honeycomb panel — finished on site to match the surrounding ceiling. This guide does not claim POP plaster itself as a shutter infill, because that material is not named in the manufacturer’s infill list. The finished result should show only a 2–2.5 mm shadow groove at the shutter-to-frame joint.
Is Planea suitable for a POP ceiling?
Not verified as such on Skyhatch’s own site. The Skyhatch Zenith+ page lists POP under Ceiling Compatibility; the Skyhatch Planea page does not list POP anywhere and is written for gypsum ceilings. For a standard-size POP opening where Planea is being considered, confirm POP suitability at quote stage with the measured B. For a POP ceiling, this guide leads with Zenith+.
Will the trap door be visible in my POP ceiling?
When closed, a correctly finished panel should show only the 2–2.5 mm shadow groove at the shutter-to-frame joint, with no visible flange and, on a push-lock Planea, no visible keyhole. Visibility after installation is usually a finishing problem — a shutter infill that was not matched to the surrounding ceiling — rather than a panel problem, which is why the infill finish is specified as “finished on site to match” rather than left to chance.
Do I need to break my POP ceiling to fit a trap door?
Not for an existing opening: the panel is ordered by B for the opening that is already there, and the frame fixes to the framing already tied above it. For a new opening in a finished POP ceiling, the framing position and the B size have to be confirmed together before a frame is ordered — that is a site decision with the ceiling contractor, not a dimension to guess from below.
Conclusion
A POP ceiling does not need a different trap door. It needs a different way of ordering, fixing and finishing the same engineered trap door: measure B, not A; fix to the tied framing or, above 1200 mm, to the slab, never to the plaster; and finish the shutter’s infill on site to match the plaster ceiling around it. Lead with Zenith+, the series Skyhatch itself lists for POP, and confirm any standard-size Planea option at quote stage rather than assuming it.
If your POP ceiling already has an opening, the next step is measurement, not demolition: measure the opening edge to edge in both directions, note whether either side is above 1200 mm, note what service sits above it, and then request a quote with that B size, so the panel that is made is the panel that fits the ceiling you already have. For the full system behind this guide — the sliding hinge, the jointed frame and the two series in full — see the Complete Guide to India’s most advanced modular ceiling trap door.