
Every finished home, office, hotel and hospital has one somewhere: the wooden hatch in the false ceiling. It was made on site when the ceiling went in, painted to match, and forgotten. Then a technician needs to reach the ductable AC unit above it, or the valve, or the junction box — and the hatch will not sit flat any more. It has warped, or it sags, or the lock barely holds, or the shutter has to be lifted off, carried down a ladder and somehow lifted back into place.
The question that follows is always the same: do we have to break the ceiling to fix this?
The short answer
No — not for a like-for-like swap. An engineered ceiling trap door can be fitted into the existing opening, in place of the old wooden trap door, without rebuilding the ceiling. That is the manufacturer’s own answer: IQUBX, the manufacturer behind Skyhatch, states that Skyhatch “can be installed into an existing opening, including in place of an old wooden trap door” — and gives one rule for ordering it: measure the existing opening and order by B, the outer frame size.
That last part is where most retrofits go wrong. The ordering rule for an existing opening is the opposite of the rule for a new ceiling, and this guide explains why, what to measure, which series fits your opening, and what to check before you order. It also says plainly what a retrofit is not: it is not a promise of zero dust or zero making-good, and it is not the same job as cutting a bigger opening. For a like-for-like swap, though, the ceiling stays where it is.
Why wooden trap doors fail
A wooden trap door rarely fails in one dramatic moment. It fails gradually, and the reasons are built into how it was made.
First, wood and wood-based boards move with humidity. In a ceiling void that sits next to HVAC equipment, humidity shifts every time the system cycles. Boards swell, shrink and warp; paint cracks along the joint; the shutter stops sitting flush. The manufacturer’s account of the same problem is blunt: faced with a large opening, “the profession improvises — a wooden trap door fabricated on site that deteriorates within a year or two” (IQUBX’s claim, not an independently measured lifespan for every wooden door). The older Skyhatch blog on site-fabricated trap doors makes the same point from the cost side: once quality board, framing, hinges, locks, hardware, carpenter labour, painting and repeated site adjustments are counted, a wooden trap door is rarely the cheap option it is assumed to be.
Second, a conventional wooden shutter is a lift-off shutter. To open it fully, someone has to support it, unhook it, carry it down a ladder, store it somewhere, and lift it back into position — often one person working at height. At 600 × 600 mm that is manageable. At larger sizes it becomes a genuine handling and safety risk: the shutter can slip while it is being removed or fall while it is being re-engaged. The push lock on a small panel is a light mechanism, “never intended to support a large, heavy shutter”, and a thin crimped frame has no room to keep a large shutter flat, so it sags and warps over time until it no longer seats properly. Those are IQUBX’s words, describing the mechanism — and they explain why a wooden hatch that was fine at handover becomes a problem a few years later.
Third, there is no engineering behind the one-off. Every carpenter details the frame, the clearances and the hinge arrangement differently, so no two site-fabricated trap doors behave the same way, and none of them was designed as a repeatable product. That is the subject of the guide on why site-fabricated ceiling trap doors are no longer good enough — and it is the reason a retrofit is worth doing properly rather than replacing one improvised door with another.
The one rule that decides the order: order by B, not A
This is the single most important section of this guide, because it is the one place where a retrofit order differs from a new-ceiling order — and getting it backwards produces the wrong size.
Two dimensions matter, and they are not the same number:
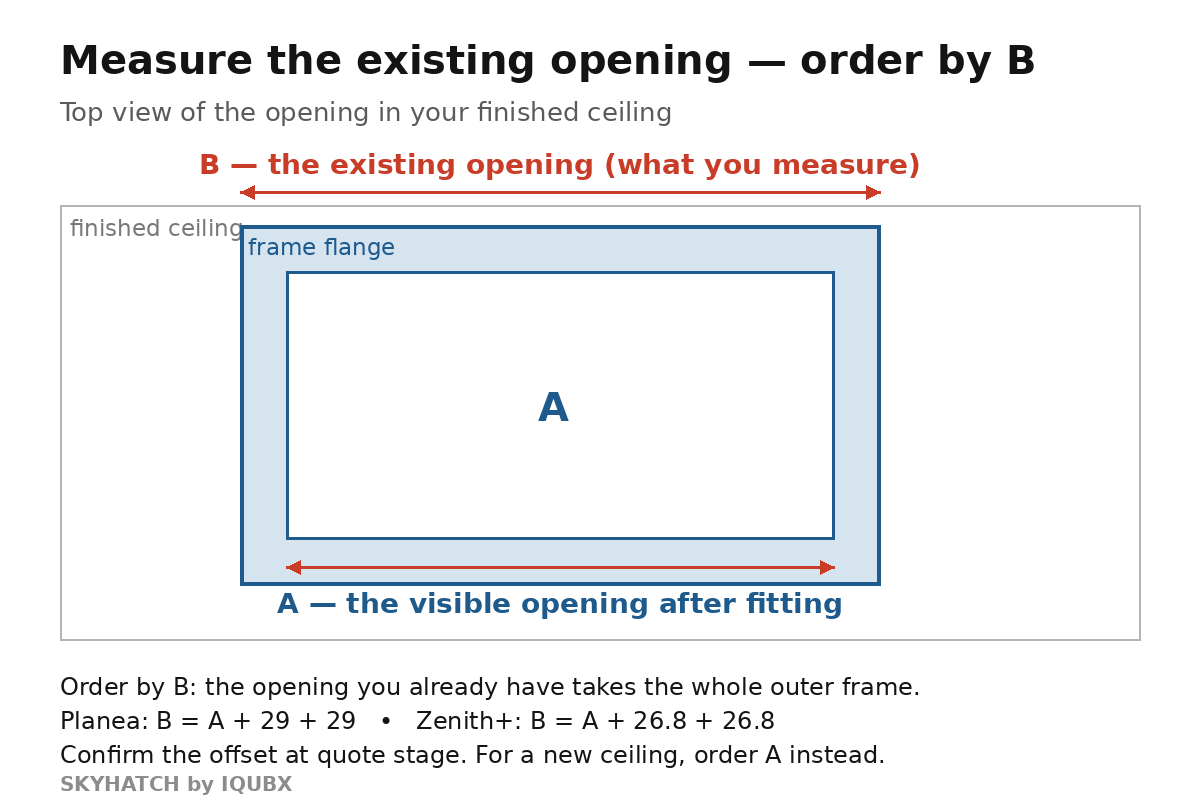
- A is the visible opening — the shutter size, measured from the inside of the outer frame to the inside of the outer frame. It is what you see in the finished ceiling, edged by the shadow groove.
- B is the outer frame size — the outer-to-outer size of the complete frame. It is larger than A, because the frame’s flange sits under the ceiling board.
For a new gypsum board ceiling, you order A: the ceiling board is fixed after the frame, runs over the flange from B to A, and the visible opening ends up as A. For an existing opening, there is no new board to run over the flange. The opening that is already in your ceiling has to take the whole outer frame — so the opening you measure is B, and you order by B.
IQUBX states the rule plainly: “Specify A for new ceilings; give B for POP ceilings or where the framing already exists.” An existing wooden-door opening is a “framing already exists” case. That is the same rule the POP ceilings guide teaches — for a POP ceiling, you order by B, the existing POP opening — and the logic is identical here.
The B offsets, and one figure to confirm at quote stage
The offset between A and B depends on the series. On the manufacturer’s page, B = A + 29 + 29 for Planea, and B = A + 26.8 + 26.8 for Zenith+. So a 600 × 600 mm Planea opening has an outer frame of 658 × 658 mm.
There is one open discrepancy to be honest about. The live Skyhatch Planea product page currently lists the flange as 26.8 mm for both series, while the manufacturer’s page and the pillar guide’s specification table give Planea as 29 mm. This blog follows the manufacturer’s 29 mm figure for Planea, as the earlier sizes guide did — but confirm the exact offset at the quote stage before ordering, so the frame you receive matches the opening you measured. Do not split the difference and do not treat either page as a correction of the other until IQUBX confirms it.
Worked example: what your measurement means
Suppose the old wooden door’s opening measures 658 × 658 mm. That measurement is B. Order a Planea at B 658 × 658, and the visible opening you end up with is A 600 × 600 mm.
Suppose instead the old opening measures exactly 600 × 600 mm. Ordered at B 600 × 600, the same Planea gives a visible opening of 542 × 542 mm — smaller than the old door’s opening, because the frame now sits inside the existing opening. That is not a defect; it is the geometry of fitting a framed panel into a finished opening. But it is exactly why the measurement has to be taken properly, and why you should check what actually needs to pass through the opening — a ductable indoor unit, a damper, a valve — before deciding the existing opening is big enough. If the equipment above needs a bigger opening than the old door, that is a different job, covered later in this guide.
| What you measure | What it is | What to order |
|---|---|---|
| The existing opening in your finished ceiling | B — the outer frame size | Order by B |
| The visible opening you want in a brand-new ceiling | A — the shutter size | Order by A (new ceilings only) |
| A POP opening, with the mesh protruding into it | B — the existing opening | Order by B (see the POP ceilings guide) |
| A bigger opening than the old door, for larger equipment | A new opening, not a swap | Set out the new opening first — see the sizes guide and the gypsum install guide |
Which series fits your retrofit?
The choice follows the size of the existing opening and what sits above it.
| Planea (CTD26) | Zenith+ (CTD25) | |
|---|---|---|
| Best for | Standard retrofits where the existing opening is routine | Large retrofits, or any opening set by equipment |
| Size range | Up to 1200 × 600 mm; stock sizes 300 × 300, 450 × 450, 600 × 600 and 600 × 1200 mm | Any custom size, up to 6000 × 2400 mm and larger on request |
| Shutters | Single shutter | Single or multi-shutter (2, 3, 4+ panels) |
| Lock | Concealed push lock standard, optional Allen key lock | Allen key (cam) lock, designed for the load |
| Fixing | Screws to the ceiling subframe | Anchored to the true ceiling soffit — RCC slab or roof structure |
| Retrofit note | Minor on-site trimming is possible; no crimping allows small size adjustments | Zenith+ “can replace existing wooden trap doors in-situ” (Skyhatch product page) |
For a standard bedroom or corridor hatch, Planea is usually the answer. For a large wooden hatch over a plant room, an AHU, or a ductable unit that has to come out whole, Zenith+ is the answer — and for a large opening, the multi-shutter version matters, because several shutters can slide aside to leave the whole opening clear, with no crossbar across it.
The retrofit sequence, step by step
This is a sequence, not a DIY installation manual. No fixing spacings, screw sizes or torque figures are given here, because none has been verified for a retrofit, and the exact fixing depends on the ceiling construction and the size of the panel. The sequence is:
- Measure the existing opening. Measure the clear opening left by the old door — that is B. Measure in more than one place, along both directions, and work from the smallest measurement: an old opening is rarely perfectly square, and the frame has to fit the tightest part of it. Note the ceiling type at the same time — gypsum board, POP, or something else — and the finish around the opening.
- Check what sits above the opening. Open the old door and look. What equipment is above it, and what has to pass through the opening when that equipment is serviced or replaced? The opening should be decided by what has to be reached, serviced and eventually removed through it — not by what the old door happened to be.
- Check the condition of the opening and the ceiling around it. Look for the things that would stop a new frame seating properly: an opening that is out of square, a frame that has warped or pulled away, board that is cracked, sagging or soft. Gypsum board is the commonest false-ceiling material in Indian homes and offices — Saint-Gobain Gyproc notes gypsum false ceilings are non-toxic and recyclable, with thermal and sound insulation — and it has to stay dry. The manufacturer CSR Gyprock advises regular inspection of plasterboard ceilings for impact damage, cracks, moisture or mould, and recommends that board which has been substantially wet should generally be replaced, because wet paper reduces board strength and the holding capacity of fixings. If the board around the opening is damaged, the honest step is to get the opening assessed before ordering, not to fit a new frame into a failed surround.
- Choose the series and order by B. Match the measured B to Planea or Zenith+ using the table above. Share the B size, the ceiling type, the finish and a photograph of the old door when you ask for a quote.
- Fit the frame to structure, not to board. Planea fixes to the subframe of the false ceiling with screws. Zenith+ is anchored to the true ceiling soffit — the RCC slab or roof structure — using GI strips, butterfly hangers or MS threaded rods, so the weight of a large trap door is carried by the structure rather than by the false ceiling framing. The load path is deliberate: shutter to frame to bracket to structure, and the false ceiling carries none of it. Loading ceiling framing with a large trap door leads to deterioration and, in the worst case, accidents. For a large retrofit, slab hangers above 1200 mm are part of the design, not an afterthought.
- Fit the infill, finish to match, and test. The shutter takes any 10–12 mm material — MR gypsum board, prelaminated particle board, WPC or PVC board, ACP, laminate, veneer on base board, calcium silicate board, honeycomb lightweight panels, or other decorative material — and the infill is finished on site to match the surrounding ceiling. Then test the panel properly: slide it open, check it stays attached and seats flat when closed, and check the lock holds. A retrofit that looks right but does not seat properly has not solved the problem.
One more practical point about the frame itself: Skyhatch frames are jointed rather than crimped, using cleats and brackets where structural rigidity is required, so a unit can be resized after fabrication — and Planea allows minor on-site trimming. That matters in a retrofit, where the measured opening and the delivered frame may differ by a few millimetres. It is a tolerance, not a licence to order the wrong size: measure properly first, and treat resizing as the safety net, not the plan.
What if the opening is not square, damaged, or too small?
These are three different situations, and they need three different answers.
Not square. Old openings often are not. Measure in several places, work from the smallest measurement, and let the jointed frame and the small on-site trimming allowance absorb the difference. If the opening is badly out of square, get it assessed before ordering — a new frame cannot true up a badly distorted opening on its own.
Damaged. Water damage, a sagging board edge, a subframe member that has pulled away — any of these means the surround has to be made good before the new frame goes in. Fitting an engineered panel into a failed surround just moves the failure to the next weak point. Again, the honest step is assessment first, not a bolder fixing.
Too small for the equipment above. This is the case people most often try to treat as a retrofit, and it is not one. If the ductable unit, the AHU section or the damper above the ceiling cannot pass through the old opening, the job becomes a new opening: cutting, re-framing, checking the services above, and setting the opening out before ordering. The sizing logic for that decision is in the ceiling trap door sizes guide, and the install sequence for a new ceiling is in the step-by-step gypsum installation guide. Do not order a panel for the old opening and hope the equipment fits through it.
The handling difference: nothing to carry down a ladder
This is the change the person who actually opens the panel will notice first. A wooden lift-off shutter has to be supported, unhooked, carried down a ladder, stored and lifted back — by one person, at height, with a heavy panel. The sliding hinge works differently: the pivot moves as the shutter opens, so the shutter stays attached to the outer frame throughout operation. Nothing has to be carried down a ladder, and nothing can be dropped. A stainless steel safety wire holds the shutter as well, and the shutter can still be removed deliberately if it ever needs to be — for full access above the ceiling, for realignment, or during installation of a bigger panel.
On a large retrofit, the same mechanism is what makes a multi-shutter panel workable: every shutter slides to one side or both sides while remaining engaged, leaving the complete opening clear without a crossbar across it. The full explanation — and why large shutters fall, sag and get carried down ladders in the first place — is in the sliding hinge guide.
Will the new panel match the ceiling?
This is the worry that stops most retrofits before they start: a new panel that sits proud, shows a frame, or finishes differently from the ceiling around it defeats the purpose of replacing the door at all.
The answer is in the infill. The shutter accepts any 10–12 mm material, so the same material as the surrounding ceiling — MR gypsum board, laminate, veneer, ACP, WPC — goes into the shutter, and it is finished on site to match the ceiling around it. Once finished, only a narrow shadow groove, about 2–3 mm, is visible at the shutter and frame joint. There is no visible flange, and with Planea’s push lock there is no visible keyhole either.
Two honest caveats belong here. First, matching a finish is site work: the paint, the laminate or the veneer has to be matched on site, and an old ceiling that has aged, yellowed or been repainted in patches will not match a brand-new infill perfectly without making good around it. Say so to the client before the order, not after the panel is in. Second, a retrofit does involve some making-good — finishing the infill, touching up the joint, and any repair to the surround. What it does not involve, for a like-for-like swap, is a new ceiling or a new opening cut. That is the promise the title makes, and it is the only promise this guide makes: no new ceiling, no new opening for a like-for-like swap — not zero dust, not zero making-good, and not a same-day swap, none of which any verified source states.
Which lock should the replacement have?
A short answer, because the full comparison already exists. Planea comes with a concealed push lock as standard, with an Allen key lock as an option; Zenith+ uses an Allen cam lock. The push lock is a light mechanism that was never intended to support a large, heavy shutter — on a large retrofit, the lock has to be designed for the load, which is what the Allen cam lock is for. Which one belongs on your panel depends on who should be able to open it and how large the shutter is. The room-by-room reasoning is in the push lock vs Allen key lock guide — read it before you specify, rather than defaulting to whichever lock the old door had.
What to send for a retrofit quote
A retrofit quote needs different information from a new-ceiling quote, because the opening already exists. Share these five things:
- The existing opening size (B) in millimetres, measured in more than one place, with the smallest measurement stated.
- The ceiling type — gypsum board, POP, or another construction.
- The ceiling finish — paint, laminate, veneer, ACP, or other.
- What sits above the ceiling — the equipment that has to be reached, and how often the panel will be opened.
- A photograph of the old door and the ceiling around it.
There is no minimum order quantity — IQUBX supplies from a single unit upwards — so a one-door retrofit in a finished home is a normal order, not an exception. And because both Planea and Zenith+ carry the GreenPro Type 1 Ecolabel — a third-party verified, life-cycle based ecolabel from CII’s GreenPro programme, which contributes to LEED, IGBC and GRIHA submissions — a retrofit in a green-certified building keeps the project’s certification story intact rather than breaking it.
Five retrofit mistakes to avoid
| Mistake | What happens | Do this instead |
|---|---|---|
| Ordering by A for an existing opening | The frame arrives sized for a new ceiling and does not fit the opening you have | Measure the existing opening and order by B |
| Measuring once, in one place | An out-of-square opening is discovered only when the frame will not seat | Measure in several places; work from the smallest measurement |
| Assuming the old opening is big enough | The equipment above cannot pass through, and the panel has to come out again | Check what has to pass through before ordering; enlarge the opening first if needed |
| Hanging a large panel off the ceiling framing | The framing deteriorates under a load it was never designed for | Anchor large panels to the slab soffit with threaded rods or hangers |
| Expecting zero making-good | The client is disappointed by finishing work that was never discussed | Say upfront: no new ceiling, but infill finishing and joint touch-up are part of the job |
Frequently asked questions
Can you replace a wooden trap door without breaking the ceiling?
Yes, for a like-for-like swap. Skyhatch can be installed into an existing opening, including in place of an old wooden trap door. Measure the existing opening, order by B, and fit the panel into the opening you already have. Some making-good around the joint and the infill finish is still part of the job, but no new ceiling and no new opening cut are needed.
Do you order A or B for an existing opening?
B. A is the visible opening — the shutter size. B is the outer frame size, and the existing opening has to take the whole frame, so the opening you measure is B. For a new gypsum ceiling you order A instead, because the board runs over the flange. If you are unsure which case you are in, the A vs B system is explained in full in the sizes guide.
What if my old wooden opening is not square?
Measure it in several places and work from the smallest measurement. The jointed frame can be resized after fabrication, and Planea allows minor on-site trimming, so small differences can be absorbed. If the opening is badly out of square or the surround is damaged, get the opening assessed before ordering.
Can a large wooden hatch be replaced with one panel?
It depends on the size. Zenith+ is made to any custom size up to 6000 × 2400 mm and larger on request, with multi-shutter versions that slide aside to leave the whole opening clear. Above a single-shutter width the panel becomes a multi-shutter assembly — one giant shutter is not the answer, and neither is a row of small panels with crossbars across the opening. Check what equipment has to pass through, then size the panel to that.
Will the new panel match my ceiling finish?
The shutter takes any 10–12 mm infill material, finished on site to match the surrounding ceiling, leaving only about a 2–3 mm shadow groove visible. An aged or patched ceiling may need making-good around the joint to match perfectly — discuss that before ordering.
Is a retrofit trap door fire rated?
No — and this matters if the ceiling is part of a fire compartment. The aluminium is non-combustible (Euroclass A1 for reaction to fire), but Skyhatch is not a fire-resistance-rated assembly and IQUBX makes no such claim. A retrofit panel does not upgrade a ceiling’s fire rating. Where a project requires a rated assembly, the correct product is a fire-rated steel hatch — a different product class, and the subject of a separate guide.
Conclusion
A failing wooden trap door does not mean a broken ceiling. It means the opening you already have needs a panel that was engineered for it: measured by B, fixed to structure rather than board, finished to match the ceiling around it, and safe to open without carrying a shutter down a ladder. The work is a swap, not a rebuild — provided the opening is measured properly, the surround is sound, and the equipment above can actually pass through it.
If you have a wooden hatch that has warped, sagged or stopped seating, measure the existing opening, note the ceiling type and finish, photograph the old door, and get a retrofit quote. One door is enough — there is no minimum order — and the ceiling above it stays where it is.
Get a retrofit quote: share your existing opening size (B), ceiling type and finish, what sits above the ceiling, and a photo of the old door.